How to Change a Cross Stitch Pattern Into a Graph Again
There are enough of dedicated cross-sew together softwares out there for design makers who desire all the bells and whistles. PC Stitch, Stitch Sketch, and Sew Fiddle to name a few.
Sometimes though, a fully loaded program can be a bit much. Peradventure y'all're a beginner, perchance you're merely designing the odd pattern, possibly you lot simply want something quick and unproblematic. Whatever the reason, information technology may make downloading and potentially paying for a ready made cantankerous-stitch software besides much of an investment.
Enter in a spreadsheet plan!
What is a spreadsheet program?
Spreadsheet programs are those estimator programs that linger at the bottom of your desktop, ordinarily ignored for years until y'all occasionally click on it to observe out what it is, and then get and so bored with it yous forget virtually it again.
They are typically used for whatsoever kind of number crunching such as finances, behemothic sets of numbers that you need to brand circuitous mathematical equations with. That'due south all nifty if y'all're an auditor only they likewise take a unique feature that make them perfect for cross-stitch pattern making; a ready made and adjustable grid structure. More on that later.
Where practise you lot notice a spreadsheet program?
That's the prissy thing about them. They are about (haha, get information technology?) everywhere! Most likely you already have one on the device you're reading this postal service with. They come preloaded onto most tablets, desktops and phones. Yous can too observe them on the internet, usually on a cloud facility such as Google Drive.
OK, so how exercise I use them to create a pattern?
I'one thousand glad you asked! Let's go through the process now.
First you need to choose the program you're using. Nosotros'll be using Google Sheets because it is accessible to about people with a gratis google business relationship. Most spreadsheet programs will have the same tools and features, so don't worry if the one you lot're using is different; you'll still exist able to follow along.
Pace 1
Open your program and if y'all don't automatically see a spreadsheet, create a blank document. You lot tin do this past selecting FILE > NEW > BLANK Document or SPREADSHEET
Footstep two
In front of you volition be a spreadsheet with rows and columns of rectangles. These rectangles are called cells. Typically a cross-sew together pattern will be rows and columns of squares. So nosotros start need to alter the cells to be foursquare shaped.
On the far left you will encounter a column of numbers. At the top of the column of numbers is a blank cell. Click on this prison cell and yous will meet the whole sheet is highlighted in blue. That means that all the cells in the sheet are selected. This is a practiced thing because information technology means you can change their shape all together at the same time.
At the top of the canvas, just below the menu you will see a row of letters from A – Z. Hold your cursor at the line betwixt A and B. You will see a little right pointing arrow appear (a right and left arrow if using Excel).
When you lot meet that niggling arrow, click and hold down your cursor. You will see that y'all are able to drag the line between A and B. Drag it to the left until your grid looks like little squares. And so release your cursor.
Here is a video showing the process:
Now your spreadsheet looks a niggling more similar a cantankerous-sew pattern grid. The squares probably won't be exact but that's OK as long as they wait like squares to yous (the process for creating exact squares is a little more involved. If this is of import to you lot, permit united states of america know in the comments and we'll create a separate video).
Step iii
Now we demand to make your spreadsheet a skilful size to work on. If yous desire a pattern that is less than 26 stitches across, y'all can go out it as it merely you'll probably want something bigger. We need make our spreadsheet about the same size every bit the sheet of Aida we are using.
Let's say you have a sheet of Aida cloth that is 8 inches high by 10 inches wide. We decide we are using 14 count Aida fabric which means there are 14 blocks per inch in the Aida material (if you're dislocated past what I mean, check out the Sew together People Cross-Sew together 101)
And then nosotros know that in that location are 14 blocks in our Aida per inch, how many cells high practise nosotros need our spreadsheet to exist?
Remember our sheet of Aida is 8 inches high, so the superlative of our spreadsheet will need to have the same amount of cells as our Aida canvas has blocks. To observe this out we multiply the count of the fabric by the height in inches.
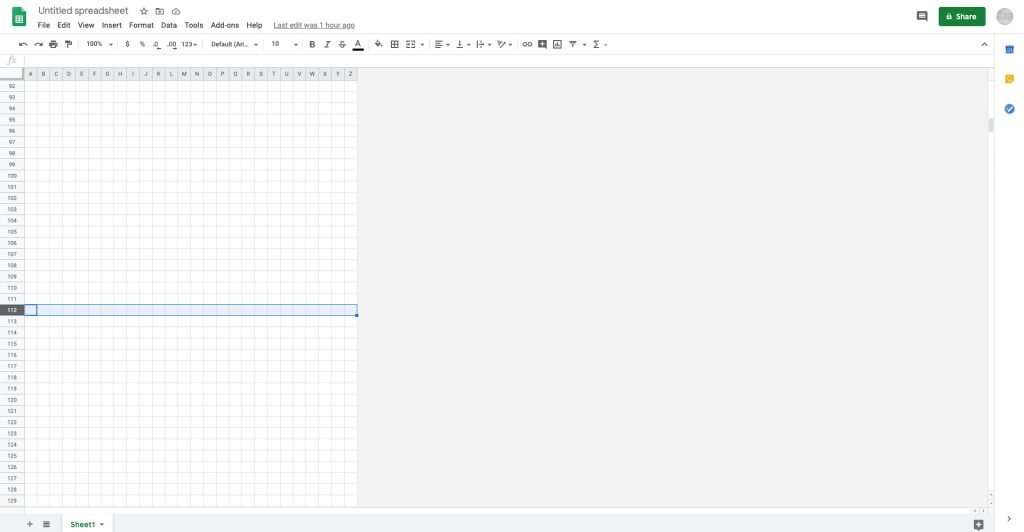
fourteen (count) x eight (inches height) = 112
Our spreadsheet needs to be at least 112 cells high! If you scroll down your spreadsheet, you will see that you have more than enough cells down to work in.
Next we need to make certain nosotros have plenty space beyond to work in. You use the same formula as higher up to work out how many cells you need across to encompass the width of your Aida sheet.
Remember your Aida canvas is 10 inches wide. Nosotros are using 14 count Aida so…
14 (count) x 10 (inches width) = 140
Our spreadsheet needs to exist at least 140 cells wide!
Footstep four
Yous will probably only need to do this part for Google Sheets, Excel users volition already have enough cells across and down to work within.
At the moment your spreadsheet columns go from A – Z which is only 26 cells across. We need it to be 140 cells across then we need to add some cells!
If your cells are all still highlighted blueish, great! If not, get back to the blank cell above the number 1 and click on information technology to highlight the whole sheet.
Move your cursor to somewhere over the highlighted area and right click to bring up the cursor bill of fare.
Get downwardly the bill of fare until you run into the option that says "insert 26 columns". Click on this option and you will see 26 more than columns accept been added to the right! That gives us 52 cells across but we need 140 so we have to add more.
Move your cursor over until it hovers over the blue highlighted area and again right click to show the cursor menu. Scroll down the bill of fare until yous come across "insert 26 right". Click on this and 26 more columns will be added.
Repeat these steps 3 more than times and you will end up with 156 cells across! More than than plenty to cover the size of Aida we are using.
Here is a video to show yous the process of calculation cells to your spreadsheet
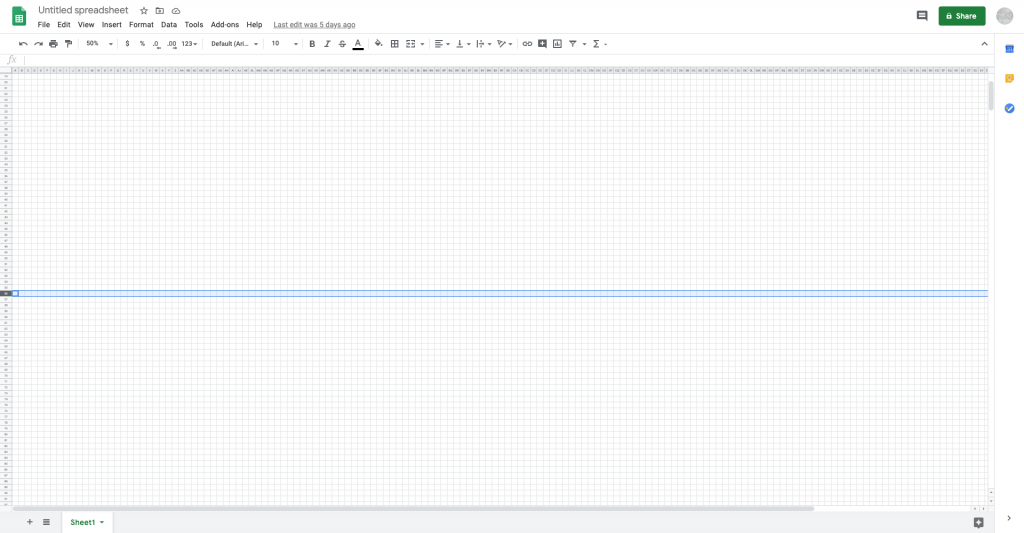
Step 5
Now we have plenty space to piece of work in merely the view is a little close. We probably want to zoom out then that we can meet more of the spreadsheet in which nosotros want to create our pattern.
At the peak of your spreadsheet you lot will run across the bill of fare. Click on the word VIEW and select 50%. That should aggrandize the view so that y'all tin can see more of the spreadsheet simply not so much every bit to make the cells too small to meet.
Here is a video showing you how to aggrandize the view of your spreadsheet:
Step six – Optional
The final footstep for creating a cross-stitch chart to work from is to find the center of your spreadsheet.
The center will need to correspond to the center of your Aida material! If you're working on a large sheet of Aida, you don't have to worry virtually this as much since pretty much anywhere can exist your center. But if, similar most of us you only accept a express amount of fabric, it'south good to find the middle then you lot can plot your pattern to make the best utilize of the space you lot have.
Allow'due south use the aforementioned example fabric that we used higher up. Our sheet of Aida is 8 inches loftier and 10 inches across. Lets first find the center of the height. To do this we utilise the same formula that nosotros used to a higher place except we dissever the number in half. That looks like this:
xiv (count) x 8 (tiptop in inches) = 112.
112 / 2 = 56
Using that formula, we now know that the middle of our Aida will exist 56 blocks down. On your spreadsheet, the center of your chart volition be 56 rows down.
It is a good thought to mark that row. We'll do that by filling in the row in a color that volition stand out to us. To do that, highlight your centre row (click on the number of your middle row). Then bring your cursor upwards to the menu. Click on the button that looks like a paint saucepan spilling over. This is your "Make full Color" button:
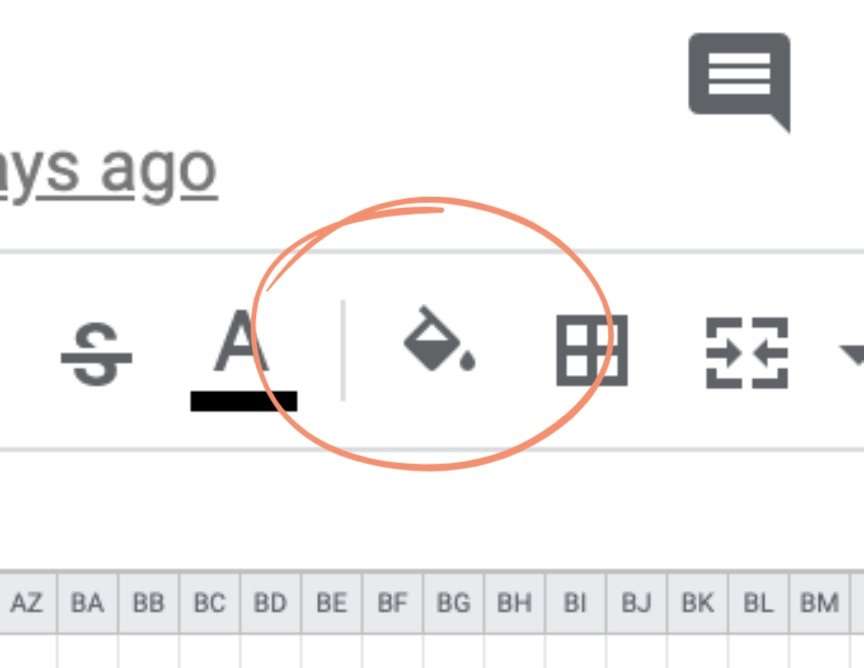
Choose a colour to highlight your row. We chose a rougey red. Here is a video of the procedure:
Adjacent we demand to detect the center across (the width). To do this nosotros use the same formula as nosotros did to observe out how many cells across we needed to represent our sheet of Aida, except this time we divide that number in half. That looks similar this:
14 (count) x ten (width of Aida in inches) = 140.
140 / 2 = 70
Using that formula we know that the eye of our Aida volition be 70 block across. On our spreadsheet, the center will exist 70 cells across. To marking the center of the width, we utilize the same process every bit in a higher place. Nosotros count the cells across to 70, highlight the 70th column and fill in the colour. Where the two lines intersect volition be the center of your chart. Here is a video of the process:
It's a practiced idea to too mark the centre of your material using removable ink or a stitch to mark the middle. That manner you'll know which block on your cloth, corresponds to the aforementioned cake on your spreadsheet.
What next?
So there y'all become! You've now created a blank cross-sew chart/grid canvas! Save/proper name the file "cantankerous-stitch nautical chart template" or something you'll remember.
On the side by side blog post, we'll talk near how to add together patterns to the spreadsheet chart you have created. Until then, if you lot have whatever questions, feel gratuitous to annotate beneath or drop us an email at info@stitchpeople.com.
Happy Stitching!
barnhillbourn1977.blogspot.com
Source: https://blog.stitchpeople.com/how-to-create-a-cross-stitch-chart-in-a-spreadsheet-program/
0 Response to "How to Change a Cross Stitch Pattern Into a Graph Again"
Post a Comment